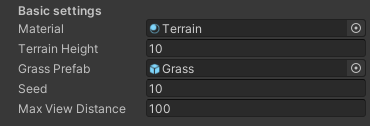
MC Terrain Demo

Getting Started

MC Terrain Demo is an implementation of the marching cubes method to generate terrain from 3D noise.

The demo version creates a static area of terrain with a fly camera to enable the generated terrain to be viewed easily.

Features include:
• Marching cubes terrain generation
• Everything procedurally generated from a single Seed
• GPU Instanced grass
• Water implementation (no water shaders are included) 

Quick Start Guide

The project is all contained in a single prefab called MCTerrain. Simply drag the prefab into the scene and expand it to find child game objects for the various features of the project:
• TerrainManager
• DevModeManager

The Quick Start Video was created for the full MC Terrain package but the getting started steps work in exactly the same way for this demo package.


Once you have imported MC Terrain you will find a ‘Tools/MC Terrain’ menu in your editor’s menu bar. You can access the project's Readme from the menu. You will also find an option called Add Tags. You will need to click on this before you run MC Terrain for the first time to add in the tags that the project expects to have available.

Once the tags have been added, pressing play will start the project. The project will then generate the chunks of terrain, and when the required amount has been generated the terrain will be displayed.

You can use the standard WSDA keys to move the fly camera, and hold down Shift to speed up the camera movement. 

Terrain Shader

To get a different texture on the sides of the terrain (eg. rock) compared to the flatter areas (eg. grass) a Triplanar shader is used. Triplanar is a method of generating UVs and sampling a texture by projecting in world space. The input texture is sampled 3 times, once in each of the world X, Y and Z axes.

The resulting information is planar projected onto the model, blended by the normal, or surface angle, with the flatter areas using the grass texture and the steeper areas using the rock
texture.

For the Standard Render Pipeline I referenced an excellent article found here:
https://catlikecoding.com/unity/tutorials/advanced-rendering/triplanar-mapping/  

Terrain Settings

Terrain Settings

The terrain is generated using the Marching Cubes method. Marching Cubes is a terrain generation method that uses 3D noise. It works by dividing the 3D space into an 3D array of cubes and then calculating the triangular sections of terrain that are contained within each cube and creating a mesh from them.

There are numerous in-depth tutorials and explanations of Marching Cubes to be found on the Internet, one of the best in my opinion can be found here:
https://www.youtube.com/watch?v=M3iI2l0ltbE


The above video goes into detail about the terrain settings. It was created for the full MC Terrain package, but the terrain settings work in exactly the same way in this demo package.

The settings for the terrain are held in the TerrainManager script which is attached to the
TerrainManager GameObject. It follows a singleton pattern so can be accessed from anywhere by creating a reference to TerrainManager.Instance in your code.

It holds the 3D noise settings for the terrain, and in the video mentioned above I look at the various settings in detail and show how the look and feel of the terrain can be altered just by using the 3D noise settings. I also discuss the options for including caves in the terrain.

The terrain also follows the height of the biome height map. To ensure the terrain is smooth the height map is enlarged so each terrain point can sample the correct height. The data for this large texture is saved in the Application.persistentDataPath location. If none of the biome settings that would alter the height map have been updated then this data is loaded into the large height texture to save having to generate the data at every game start. The biome settings that would affect the biome height data are saved in Json format in the Application.persistentDataPath location and are compared with the current settings to see if the data can be used or if new height data should be generated.

Terrain Settings - Demo version

Basic settings

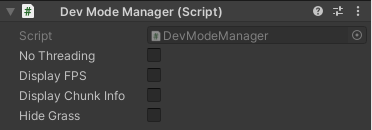
The demo version of MC Terrain does not support different biomes so the settings for the single biome that is included are found in TerrainManager under Basic settings as shown.

The Material is a material with a Triplanar shader to allow for both the rocks and grass textures to be displayed depending on the angle of the terrain.

Terrain Height sets the height for the hills in the terrain.

The Grass Prefab is a grass prefab that includes the grass GameObject and the GrassController script. See the Grass Prefab section below for details.

Seed is the seed value used for all random number generation throughout the project.

In the full package Max View Distance sets how many meters away from the player in each direction the terrain will be visible at all times. In this demo version the distance is used to determine how large the generated terrain area will be by generating terrain to cover the distance value in all directions from the centre of the terrain area. 

Biomes

Although this demo version of MC Terrain doesn’t support multiple biomes I have included the code that generates the height map for the biomes as the value from each chunk position on this height map is added to the chunk’s height to give more height movement to the terrain. Including this means that the generated terrain is identical to the full package when the same seed value and terrain settings are used.

Chunk Class

This class holds all of the information and methods for creating and modifying a chunk game object. It also holds information about each of its neighbouring chunks, taken from the biome map height
and biome type textures.

Each of the 16 x 16 terrain points in the chunk has a base terrain height value, taken from the biome height map. This means that the terrain gradually raises and lowers to match the biome map, and any 3D noise is added to this base height.

The 3D noise for the chunk is generated and stored in the float array _densityMap using OpenSimplex2F noise generation script. This is then added to the base terrain height for the chunk, and any cave data modifications made, and the result is then stored in float array _terrainMap.

If caves are generated in very low areas, then they can hollow out to the bottom of the chunk leaving a gap in the terrain. Therefore, a check is made to see if there are any gaps along the bottom of each chunk. If there are then the Floor Prefab is instantiated as a child object of the chunk and is given the correct biome material for the chunk. 

Terrain water settings

Water settings

Adding Water

If you want to use a Water Plane to show water, then Include Water should be checked. If Include Water is checked then a Water Plane GameObject must be included to represent the water visually.

Adding Water


The Water Plane should be a GameObject that is 16m x 16m on the X and Z axis to match the size of a Chunk, and should have a material applied with a water shader on it.

In this video I create a suitable Water Plane object using a free water shader found on the Unity Asset Store and add it to MC Terrain. The the video was created for the full MC Terrain package, but the water plane works in exactly the same way in this demo package.


The Grass Prefab

The Grass Prefab

Grass in displayed using GPU Instancing by instantiating a Grass Prefab as a child of each chunk that requires grass. Each grass Prefab can include a different grass mesh and texture resulting in a different grass type for each biome.

This video goes into detail about the grass prefab. The the video was created for the full MC Terrain package, but the grass prefab works in exactly the same way in this demo package.

The Grass Controller prefab has the GrassController script attached, and this gives access to the Mesh and Material to be used to display the grass. The Mesh ideally should be a very low triangle count, made up from, for example, a few Quad game objects or similar.

The Material should have a transparent texture and use the included ‘Custom/InstancedTexture’ shader, or an alternative shader that supports GPU Instancing, and have the Enable GPU Instancing option checked.

The inspiration for the grass came from the article found here:
https://toqoz.fyi/thousands-of-meshes.html.

To display the grass the GrassController script creates a dictionary of the vertex points in the parent mesh object, with a small amount of X and Z randomisation added. A bool is used to indicate if the point should display grass or not, and sets any points with a Normal value over 0.85f to true. A Matrix4x4 is then created from all of the positions that have been set to true, complete with a random rotation and scale. This is then passed to the GPU using the Graphics.DrawMeshInstanced() method. 

Dev Mode Settings for Demo version

Dev Mode Settings

Dev Mode

The DevModeManager script is attached to the DevModeManager GameObject and allows the user to set various dev mode flags.

The No Threading option disables the CPU Threading when creating the chunks. If unexpected behaviour occurs when making changes to the area of the code that creates and displays the chunks, check this to disable threading to see if that is the cause of the issue. If this is the case, be sure to either make new code thread-safe, or move it outside of the threaded code.

The Display FPS option Displays the FPS in game mode. This can also be toggled when the game is running using the F1 key.

The Display Chunk Info option displays various data for the chunk that the player is currently standing on. This can also be toggled when the game is running using the F2 key.

Hide Grass is an easy way to remove the grass from the game for testing purposes without having to make any changes to the code to stop it from displaying. 

© Copyright 2023 MC Terrain. All Rights Reserved.