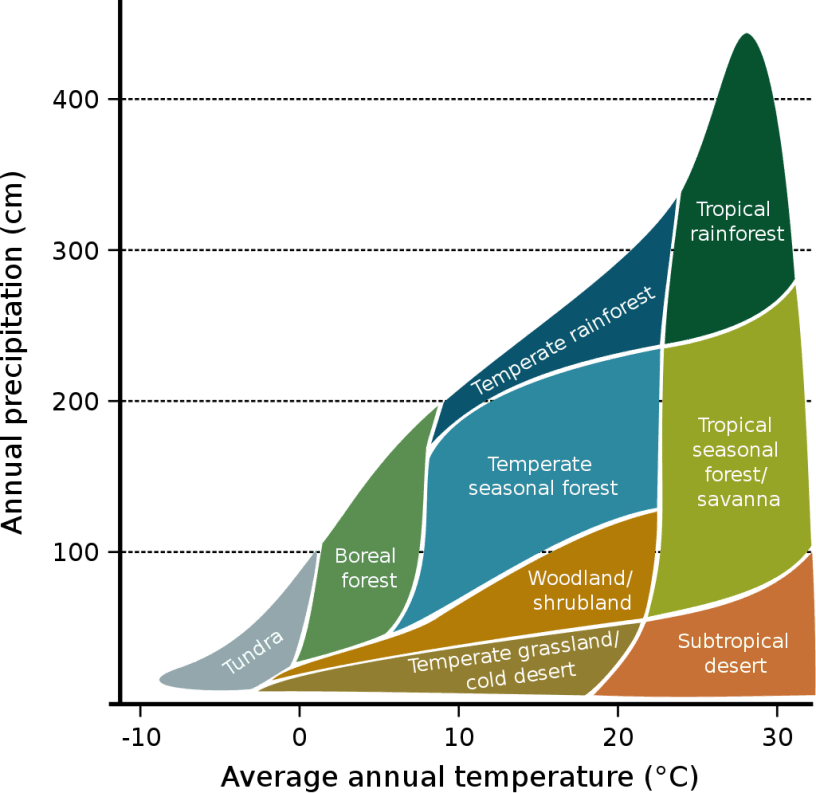
Biomes

The Whittaker Model

The Whittaker Model

The files in Scripts/Biomes/MapGeneration were taken from the 4-part article found here:
http://www.jgallant.com/procedurally-generating-wrapping-world-maps-in-unity-csharp-part-1/

Some minor changes have been made but the logic is still the same so I recommend reading the article for a better understanding of the code.

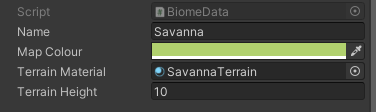
The code is based on biomes described in the Whittaker Model which classifies the biomes based on precipitation and temperature, with standard naming and colour for each biome type.

However, the names and colours have been abstracted so they can be set in the biome data files, as instead of an Ice biome for example, a Lava biome might be required instead 

RegionType Enum

RegionType Enum

The Enum RegionType is used so describe the biome as shown with the original Whittaker name in the comment for reference.

The biome map is procedurally generated using the same Seed as the terrain and the result used to generate a texture. A second copy of the texture has the player’s start position added to it and is displayed on the BiomeManager/BiomeTexture game object so that the map can be visualised. The height map used to generate the biome map is also stored as a texture but is not displayed in scene view.

Setting Up Biomes

Each pixel of the textures represents one terrain chunk, so the chunk class is able to query its biome type and height from these textures. Further, each chunk is able to query its neighbouring chunks’ biome type and terrain height for use when placing scenery objects and raising and lowering terrain.

The biome map wraps in all directions, and chunks are able to be positioned at negative values allowing for potentially endless terrain.

Sea Border Settings

Sea Border Settings

Map Generator Script

The Map Generator script is added to the BiomeManager game object and is the entry point for generating the biome map.

Ticking the ‘Add Sea Map Border’ checkbox will combine the Textures in Height Map Edge and Biome Map Edge with the generated ones to create the border. The colours for these textures need to exactly match the colours for deep and shallow water used in the biome scriptable object files for those biome types to ensure they are correctly identified with the correct biome type.

If the sea border option is not checked then these two texture variables can remain empty. 

Mobirise Website Builder

Height Map Settings

The Height Map settings are used to generate the height map data for the biome map. The octaves and frequency determine how irregular the height is.

The other settings indicate at which height that a specific terrain type will be used. In this example, all height values from 0.0 to 0.2 will be considered as Deep Water, values from 0.2 to 0.3 as Shallow Water, and so on.

The settings for the Heat Map and Moisture Map work in exactly the same way and the result of all three groups is combined to create the finished biome map.

Preview Biome Layout Button

Preview Biome Layout Button

The Preview Biome Layout button allows you to preview the settings for your biomes by generating the biome map in the editor. Note that the Seed for the map and the Player Position come from the TerrainManager script.

If you change the biome map settings and then start the game without previewing the map layout first then the new settings will be used in-game and a new biome map texture will automatically be saved so the new biome map layout is correctly shown in scene view after the game has been stopped again.

Biome Manager Script

The Biome Manager script is added to the BiomeManager game object and has public references to the biome data ScriptableObject files.

It is responsible for creating the biomes using the data for each one contained in the biome’s scriptable object file. It is also responsible for returning the biome type and height for each texture pixel on the biome map and for returning the correct terrain material for each biome type. 

Create Biome Data Menu Item

Create Biome Data Menu Item

Biome Data

There should be a BiomeData ScriptableObject created for each biome type. To create a new ScriptableObject, right click in the Project panel, choose ‘Create’. BiomeData is found at the top of the Create Menu as shown.

Initial Biome Settings

Initial Biome Settings

At the top of the ScriptableObject you can set the name of the biome, the colour used to display it on the biome map texture, the material used to paint the terrain chunk, and the maximum height of hills in that biome.

The material should use a TriPlanar shader so that different textures are used depending on the slope of the terrain.

The Terrain Height value limits the maximum height of hills in that biome. It is recommended that there is only a small value difference between adjoining biome types, e.g. 2f, to allow for a smooth transition between terrains. 

Custom Biome and Height Maps

Custom Biome and Height Maps

MC Terrain also supports the use of custom biome and height maps. This allows you to create your own terrain height maps and biome layouts, and then have MC Terrain add its 3D noise to your designs giving them caves and tunnels.

Custom Height and Biome Textures

Custom Height and Biome Textures

It will also allow the player to interact with your terrain ideas in play by raising and lowering the terrain. To add your own designs, you need to have the BiomeManager GameObject selected, and add them to the Custom Height Map and Custom Biome Map fields.

Texture Import Settings

Texture Import Settings

The textures have to be 512 x 512 pixels, and in the texture import settings Read/Write must be checked, and Compression set to None. When a texture is added its properties are checked and the texture will not be added by the Inspector if they are not correct. If this happens then the console will show the required settings and compare them to the settings of the texture you attempted to add so you can see which settings are incorrect.

There is an example biome map texture and an example height map texture included in the project for reference. They are found in:
Assets/MCTerrain/Textures/Custom Biome Texture Examples

If just a Custom Height Map is loaded then the settings for generating the biome map colours will still be used, and if just a Custom Biome Map is loaded then the settings to generate the height map will still be used. But if both custom maps are loaded then the settings to generate the height and biome maps will be completely ignored.

It should also be noted that the Add Sea Map Border setting will only be applied to an internally generated map, it will not be applied to any custom maps that have been loaded. 

Tree Settings

Tree Settings

Adding Scenery Elements

The settings for the four scenery object types: Tree, Bush, Rock and Stone all work in the same way.

The positions for each item are generated using a Poisson Disc Sampling algorithm. There is an abundance of references to this on the Internet. An excellent explanation and example of the method can be found here:
https://www.youtube.com/watch?v=7WcmyxyFO7o

Adding Scenery

The Density value is used to determine how many passes of the algorithm will be performed, the higher the number the greater the number of valid positions.

The Radius value determines how close each object can be placed to adjacent objects of the same type.

The Appear in Chunk value for each object type is a float between 0 and 1. This value is compared to a random number and the higher the number is, the more likely that objects of that type will appear in the chunk.


For example, having a low Density Radius will position the objects closely together, and having a low Appear In Chunk setting will reduce the number of chunks that include the objects, resulting in fewer groups of tightly packed objects in the biome.

Conversely, having a large Density Radius and a large Appear In Chunk value will have more evenly spread objects of that type throughout the biome.

If the Single Per Chunk is checked then only a maximum one object of that type will be placed per chunk. However, this is still affected by the Appear In Chunk value so, for example, very sparse objects can be created with a low Appear In Chunk setting and Single Per Chunk being checked.

Multiple prefabs for each object can be added to the Prefabs array and they will be selected at random by the Scenery Manager script to offer variety within the biome. 

Grass Settings

Grass Settings

The Grass Prefab

Grass in displayed using GPU Instancing by instantiating a Grass Prefab as a child of each chunk that requires grass. Each grass Prefab can include a different grass mesh and texture resulting in a different grass type for each biome.

The Grass Controller Prefab

The Grass Controller prefab is instantiated as a child object of each terrain chunk that requires grass to be displayed.

There can be a different one for each biome type if required, and this is set in the Biome Data Scriptable Object settings for each biome type.

The Grass Controller prefab has the GrassController script attached, and this gives access to the Mesh and Material to be used to display the grass.

Grass Controller Script Settings

Grass Controller Script Settings

The Mesh ideally should be a very low triangle count, made up from, for example, a few Quad game objects or similar.

The Material should have a transparent texture and use the included ‘Custom/InstancedTexture’ shader, or an alternative shader that supports GPU Instancing, and have the Enable GPU Instancing option checked.

The inspiration for the grass came from the article found here: https://toqoz.fyi/thousands-of-meshes.html.

To display the grass the GrassController script creates a dictionary of the vertex points in the parent mesh object, with a small amount of X and Z randomisation added. A bool is used to indicate if the point should display grass or not, and sets any points with a Normal value over 0.85f to true. A Matrix4x4 is then created from all of the positions that have been set to true, complete with a random rotation and scale. This is then passed to the GPU using the Graphics.DrawMeshInstanced() method.

When the terrain is lowered or raised the vertex positions within a radius of 2f are set to false in the dictionary, and a new Matrix4x4 is created with from the updated dictionary. This means that no grass remains where the terrain is raised or lowered which ensures, for example, that no grass is left floating if the terrain is lowered.

© Copyright 2023 MC Terrain. All Rights Reserved.